Denker's Metalworking Project
Page
Contents:
Lathe
Multi-Stop (New)
Micro
Drill-tap Adapters (Changed)
Mill
Tapping Head (New)
Quick
Change Tool Post Set (Changed)
Reciprocating
File (New)
9" Disk Sander
This
was one of my very first projects. It is made mostly of wood but does have some
0.18" thick steel parts that I laser cut at work. I used a 1-horse
1725-RPM motor. It was originally made for wood but works very well on metal. I
added the SCOTCH-BRITE deburring wheel later (runs
about 3450 RPM) and it can be removed if necessary. The table can tilt down 45°
and has a groove for a slide guide. This sander gets used often.
Boring Head
The
workspace between the mini mill head and the worktable is quite limited.
Because of this I use a set of screw machine drills which are shorter than normal
jobber drills. I didn't want to by the common 2" boring head for the same
reason - so I made my own. This head was made from 1" x 2" steel bar
and uses 0.375" diameter tools. It mounts in a 0.75" diameter holder
and extends down from it about 2". It works for diameters up to about
2". This design has a socket head cap screw that must be loosened to make
adjustments then tightened again.
Cutoff fixture
Unless
you want to buy all your hardware to needed size, you will need to cutoff
bolts, pins, and shafts from time to time. I was doing it often, so I came up
with this fixture. It uses a 26-RPM geared motor turning a 1/2" chuck and
a DREMEL with a 1.5" cutoff wheel. (The one in the picture is wore down) I
can move the cutoff wheel away from the chuck about 3" so fairly long
parts can be cut off. I have cut everything from brass screws to hardened round
tool bits.
Lathe Grinder fixture
When
I need to cutoff something bigger, I use this fixture on the mini lathe. It
uses a CRAFTSMAN tool grinder and it is quite big. (The tailstock must be
removed) This thing runs at 25,000 RPM and can vibrate a bit so everything must
be tight. TIP: place wet shop rags under the grinding area and on wear surfaces
to catch the grinding dust - grinding dust and oiled machine wear surfaces
don't mix. Clean and oil the machine when done!
In the next picture I am cutting off a
hardened 1/2" bar using a 3" cutoff wheel. Also shown is a SCR motor
speed controller.
Mill High Speed
Spindle
The
CRAFTSMAN tool grinder used in the above project can also be used on the mini
mill to make a high speed spindle. The spindle is mounted in a 3/4" R8 collet and the drawbar is replaced with a threaded
0.26" I.D. x 0.50" O.D. steel tube. The grinder and its mounting
bracket are then mounted on top of the mill. I am using a SCR motor speed
controller to control the spindle speed. Notice I placed a lock on the mill
power switch to make sure I don't mistakenly try to turn it on.
The
next picture shows all the parts made for this project. I used ball bearings
rated at 43,000 rpm for the spindle but they are quite small and I am not sure
how well they are going to hold up. The collet and collet nut are purchased ROTO ZIP CT250 (0.250" dia.)
or CT125 (0.125" dia.) replacement parts. The drive shaft that goes
through the drawbar is 0.187" diameter. Plastic was used on the grinder
mounting bracket to help reduce vibration.
The next picture shows the spindle in
a 3/4" R8 collet with the hollow replacement
drawbar attached.
Index Fixture
If
you want to make any kind of marked dials, it is nice to have an indexing
fixture. This one was made using a purchased replacement lathe spindle, bearings
and other parts in a surplus steel casting. (not available anymore) The index
and vernier plates were laser cut at work and gives
me 3 ranges to work with. (28, 360 and 200) I can also mount other index plates
to it. The spindle can use a lathe chuck or MT3 collet
so there is nice versatility. (also has a 0.81" diameter through hole) The
marked dial on this fixture and many others were made using it. There are cheap
5C collet index fixtures available if all you want is
the 360 step range or of course you can use a rotary table.
I also made the tailstock shown in the
picture.
Lathe Ball &
Radius fixture
This
is a ball and radius fixture I made for the lathe. It uses a 0.375" tool
bit that can be set with a micro dial (0.050" per rev.) and can handle
parts up to about 2" in diameter. This is a good design for making ball
ends but somewhat limited for large part radius edges and special radius
shapes.
Lathe Carriage
Micro-Stop
Before
I made this stop, I used a hand wheel and dial on the lead screw shaft or the
compound rest to get the depth of bores etc. This works so much better. To use
(with the machine off) I set the cut tool against the gauge surface of my part
and with the micro-stop set to 1.000" bring it up against the carriage and
lock it down. Then dial back the micro-stop the depth of the bore or cut and
it's set. For more than 1", I use a spacer when setting it up. Both the
lock lever and the stop use 1/4-20 L.H. threads. This design has a low profile
and fits under the chip pan that I added to the carriage. I use this stop
often!
Lathe Knurl fixture
I
have two knurl tools. A scissors type diamond pattern tool and this straight
knurl fixture. I made this because I didn't want to buy another scissors tool,
but for the mini lathe the scissors tooling works best. To keep compound slide
screw forces to a minimum, I went with a bottom up design. This puts all the knurl
pressure on the lathe bed.
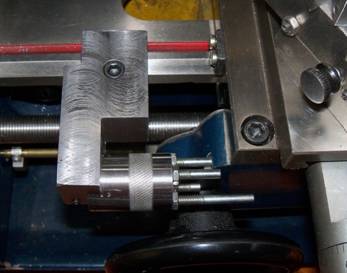
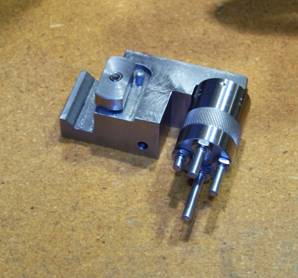
Lathe Multi-stop
When
making parts in quantity, it is nice to have more than one stop in the setup.
This is like others out there for other lathes but this is made for the
Mini-Lathe. It has 4 positions and each stop can be set to a desired length and
rotated into position as needed. Each stop has over 1.0" of usable 1/4-20
threads for setup and I have longer stops if needed. (The 3 stops not in use
will normally fit under the Cross Slide.) There is also an additional
unthreaded 0.250" dia. hole in the main part of the assembly for a fifth
longer stop that can be inserted and removed as needed.
Micro Drill-tap
Adapters
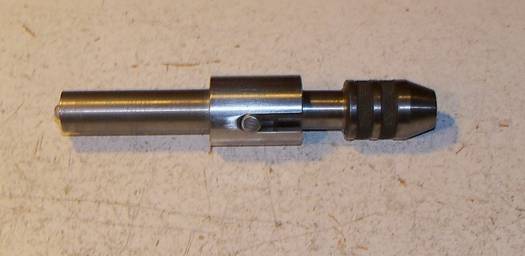
For
small drill sizes you really need a micro drill adapter. The mini-mill has too
much head weight to use with small drills. I made this one with a 1/4"
chuck and with the addition of a reverse switch on the mill, I can use it with
small taps too. (Spiral point taps in through holes) The outer shaft is 0.625"
diameter and the inner shaft has 0.80" of spring loaded movement. A
knurled aluminum collar pressed on a ball bearing is mounted just above the
chuck for easy hand control. Above the bearing is a rubber o-ring to deaden any
release shock. (Tapping only works if a reverse switch is added to the mill)
For
taps above #6 to 1/4", I took a tap wrench and modified it for the mill.
It is now a spring loaded floating tap holder with a 0.625" dia. mount and
about 0.65" of usable movement. With the lower speed addition to my mill,
it will tap 1/4-20 in steel with no problem.
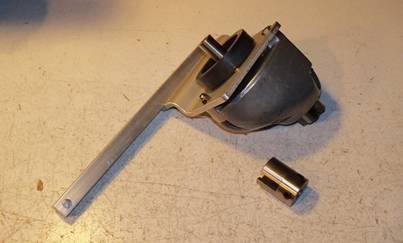
Mill Tapping Head
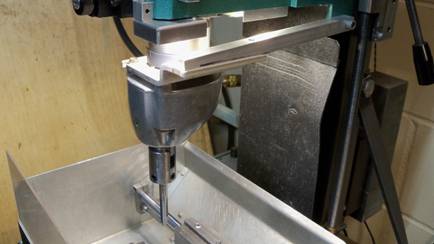
I
had this old Craftsman drill head from an electric drill that the motor went
bad on and I decided to convert it into a mill tapping head. This is on old
metal housing drill so I think it is pretty heavy duty. The gearing is a little
over 12:1 so plenty of power is available. I had to rework the drill some for a
good mounting surface and bigger mounting screws. The old motor shaft was cut
long enough to press fit a new 0.500" dia. straight shank on it. I used a
0.500" bronze bearing to hold it in place. The output is about 0.70
forward of the input and the head is just over 2.50" long so I had to make
a short tap holder to keep it usable. So far it has worked great. I have tapped
steel using a 7/16-14 CNC style tap (not a hand tap) but would not want to do
it with anything bigger. The holder will take up to a 1/2" tap. This is a
float tap system and should be used with through holes or holes deep enough to
hold the tap and threading chips. It can also be used with form taps. This has
only about 1/2" of usable movement so I have to stop and reposition the
mill head during the tapping process. With large taps, the mill head is not easily
moved.
Quick Change Tool
Post Set
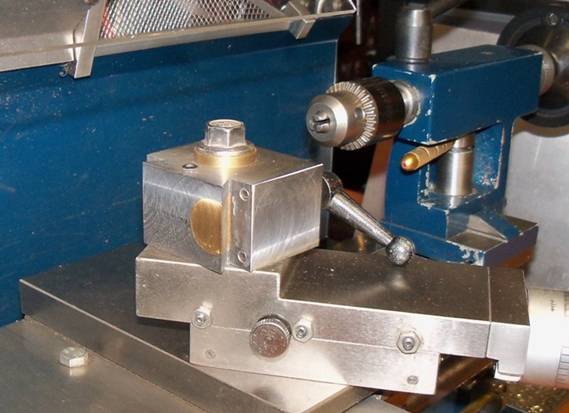
One
of the first things I made after building the mill was a set of quick-change tool
holders and tool post for the mini lathe. I made these out of aluminum but some
people would prefer steel. Aluminum works fine for the forces used on the mini
lathe and is easier to machine. (wear hasn't been a problem) I have now updated
the quick-change Tool Post using steel. It has a bigger clamping surface and is
a better designed Post. This was an attempt to fix a problem that turned out to
be somewhere else. (see Cross Slide Lock)
Most
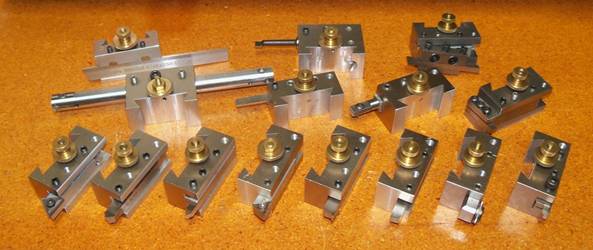
holders are 1" x 1" x 2" and can be used with up to 3/8"
tooling. One is made for a 1/2" high cutoff blade and two made for a
3/8" and 1/2" boring bar. Also
some of these are now made of steel.
The
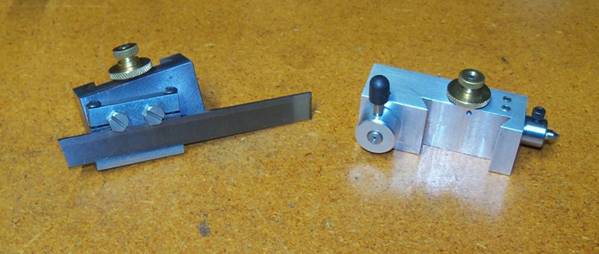
next picture shows my two latest tool holders. The one on the right is a
retractable threading tool. It can retract the cutting bit about 0.10" for
the return trip to the start of the cut. This was an easy to build design and
it works great. (It uses a 0.187" diameter tool bit) The cutoff blade
holder on the left is set at 14° for better cutoff action on steel and is
mounted to a steel holder.
A
note on tool bits: I have come to realize that smaller is better! Only a small
area of a tool bit is actually used when cutting and the smaller tool bits are
far faster and easier to sharpen.
Reciprocating File
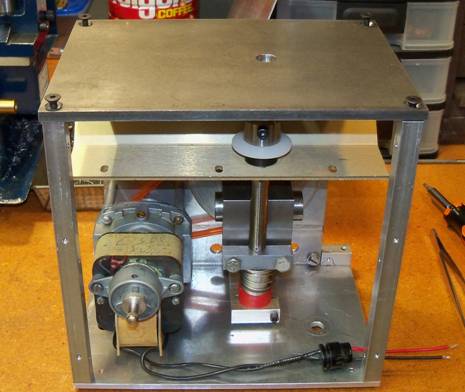
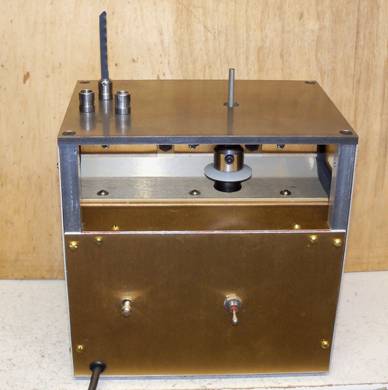
The
winter of 20-21 was a long one because
of the pandemic, so I did more work in the shop. This motorized reciprocating
file was one of my projects. It has a little over 1" stroke and runs at
about 3 strokes per second. It has a gear motor that uses about 120 watts and
seems to be strong enough for what it does. This is designed for precession
work, not fast work and for files of about 1/4" dia. in size or less. The
knob on the motor is so I can manually lower the shaft for easier mounting of
the file. The file is placed in a 0.50" dia. steel cup and then filled
with solder (no flux) to hold it in place. The cups have a small pin in them so
after the solder cools, the files can't be pulled out or move. I use the mill
to hold the file square for soldering. The file has to be cut off and placed in
the cup upside down so that it will cut on the downward stroke. I also made one
holder for a reciprocating metal saw blade which is held in by a set screw. I
used a 0.050" thick aluminum gold anodized door kick plate to make the
sides. The project turned out quite nice.
Right Angle Mill Head
Attachment
This
project was done mainly to see if I could do it. It also required making a
spindle collar for the mill so the angle attachment would have something to
mount on. The attachment uses BOSTON 2:1 spiral bevel gears. The output shaft
is a 1.25" diameter MT3 straight socket cut down to the desired length.
That and ball bearings are put inside a surplus steel casting. (not available
anymore) The output speed is half of the input so it doubles the mill output
torque.
This
attachment requires a mill reverse switch. In the next picture you can see I
mounted it behind the control box. I had to flip the cover plate around so the
power switch was on top. This picture also gives you a view of the spindle
collar that was added. (replaced a plastic cover) When the angle attachment is
not in use, I add a knurled ring to the bottom of the spindle for easier hand
turning.
As
long as I now have a right angle mill attachment, I made a 1" saw arbor
and bearing block mount for the mill column. There is a lock lever on the block
so it and the mill lock lever have to be tightened when in use. This is a
little tricky to setup but it sure works nice.
The next picture shows its parts.
Sheet metal Hand
Brake
This
device is used to form sheet metal and I use it to make guards and covers etc.
This is a bit heavier duty then many out there you can buy. It will handle up
to 0.060" steel or 0.080" aluminum. If the parts are not very wide,
it will handle thicker material. I made it because I was a sheet metal part fabrication
engineer and I just had to have one, but it does get used.
All pictures and
content Copyright © 2007, 2009, 2020, 2021 David Denker.
All Rights Reserved.
Last Revised: Feb.
2021